
DJI Goggles 3 vs. Goggles 2: What Are the Differences? Which Should You Buy?
I’m excited to introduce the DJI Goggles 3, the latest addition to DJI’s FPV goggles lineup. While the Goggles 3 might look similar to the DJI Goggles 2 at first glance, there are significant innovations that set them apart. In this review, we’ll delve into the differences between the Goggles 3 and its predecessors, explore the improvements made, and help you decide if it’s time for an upgrade.

For a look at the DJI Avata 2, check out my detailed review here: https://oscarliang.com/dji-avata-2/
Where to Buy?
Get the DJI Goggles 3 from these vendors:
Purchase the DJI Goggles 2 at:
Specifications
When comparing the specifications, it appears DJI designed the Goggles 3 (G3) with features closely resembling those of the Goggles Integra, rather than just an upgrade from the Goggles 2 (G2). Below is a table summarizing the technical specifications of the G3 alongside the G2 and Integra for a clear comparison.
| Feature | DJI Goggles 3 | DJI Goggles 2 | DJI Goggles Integra |
|---|---|---|---|
| Display Size | 2 x 0.49″ OLED | 2 x 0.49″ OLED | 2 x 0.49″ OLED |
| Display Resolution | 1920×1080 | 1920×1080 | 1920×1080 |
| Refresh Rate | 100Hz | 100Hz | 100Hz |
| Feed Resolution | 1080p 60/100fps | 1080p 60/100fps | 1080p 60/100fps |
| Frequency Range | 2.400-2.4835GHz 5.170 -5.250GHz 5.725-5.850GHz |
2.400-2.4835GHz 5.725-5.850GHz |
2.400-2.4835GHz 5.725-5.850GHz |
| Field of View (FOV) | 44° | 51° | 44° |
| Display Scaling | 50% to 100% | 50% to 100% | 50% to 100% |
| IPD Adjustment | 56 to 72mm | 56 to 72mm | 56 to 72mm |
| Power Input | Integrated battery (7.2V 3000mAh, 21.6Wh) | 9V Input, Dedicated Battery (2S 1800mAh, 18Wh) | Integrated battery (7.2V 2500mAh, 17.64Wh) |
| Weight | 470g | 290g | 410g |
| Price | US$499 | US$449 | US$349 |
Prices were last checked on DJI’s official website at the time of publishing.
Appearance and Design
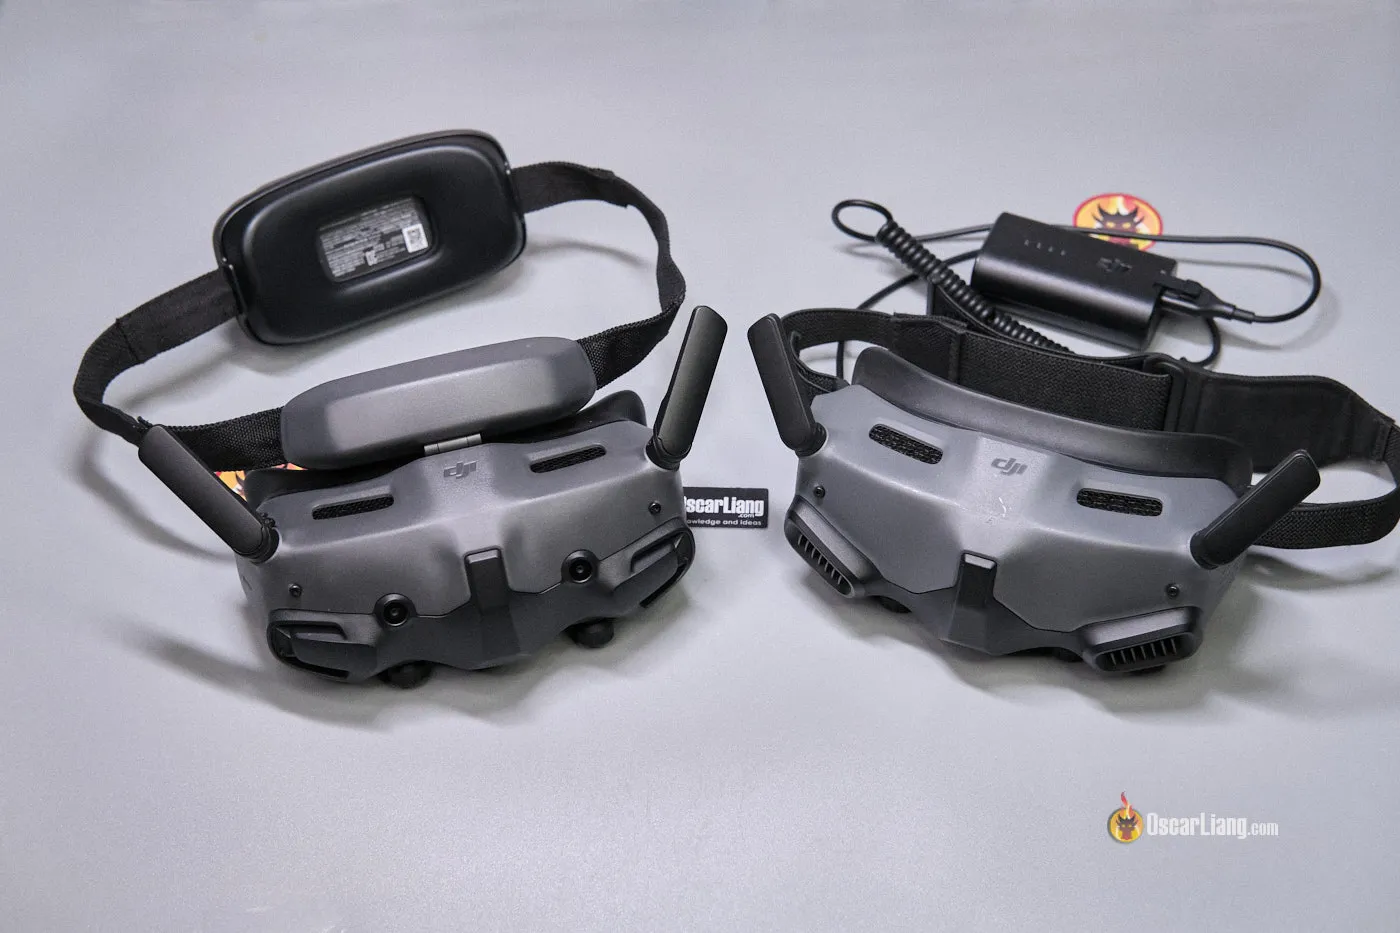
The DJI Goggles 3 maintains a design aesthetic similar to previous models, featuring a consistent color scheme. A notable change in the Goggles 3 is the head strap’s attachment, which connects to a forehead pad rather than the sides. This design change promises improved comfort during use.

Like the DJI Goggles 2, the antennas on the Goggles 3 remain foldable but are now non-removable. While this design choice simplifies the structure, it unfortunately limits the ability to upgrade to aftermarket antennas, which could be a drawback for some users.

A built-in cooling fan turns on automatically when the goggles powers on. Though the fan noise is present, it is not overly loud. Users can also turn on Anti-fog function in the menu to increase the fan speed and prevent the lenses from fogging up.
The placement of the micro SD card slot has been shifted to between the two screens, mirroring the layout seen in Fatshark goggles. Additionally, there’s a proximity sensor between the eyes that detects when the goggles are being worn and turns off the screens automatically to save power when they are removed.

It’s exciting to see DJI finally stop using the touchpad and replaced it with a joystick and button, enhancing the tactile feel and responsiveness of menu navigation. This change makes the user experience more intuitive and enjoyable. Users familiar with the Goggles 2 will appreciate that the on-screen menu and operation remain similar, ensuring a seamless transition to the Goggles 3.

However, the removal of the LED array that previously displayed the frequency channel is a minor setback. On a positive note, the addition of a power button with a battery level indicator on the Goggles 3 is a welcome feature.

Integrated Battery
One immediately noticeable feature of the DJI Goggles 3 is the integrated battery pack located at the back of the head strap, similar to the design seen in the Goggles Integra. This configuration significantly boosts comfort by eliminating the need for a dangling external battery pack, though it does mean you cannot swap batteries.
Despite the non-removable design, the Goggles 3 offers a larger battery capacity (21.6Wh compared to 18Wh in the G2) which contributes to a slight increase in weight. Nonetheless, the advantage of not having to carry the battery separately—as was necessary with the G2—enhances the user experience significantly.
The G2 allows for power input from any 9V source, and I have personally used the Speedybee BEC along with a large 6S Li-ion pack, enabling me to fly all day without the need for recharging. It’s good to know that the G3 offers similar flexibility to that of the G2. For those who need extended use, the Goggles 3 can also be powered via a USB power bank through a USB-C connection.
The battery life of the G3 is robust, providing approximately three hours of use on a full charge, with a recharge time of about 1 to 1.5 hours at 20W via USB-C.
Display, Focus, and IPD Adjustment
The screens are the same size as the Goggles 2 and Integra, with the same image quality and refresh rates.
One notable change in the new model is the field of view (FOV). The Goggles 3 offers a 44° FOV, the same as the Integra, compared to the Goggles 2’s wider 51° FOV. Although 44° might sound considerably smaller, many users, including myself, found the 51° FOV in the G2 too large, often causing blurry edges. As a work around, I had to scale the display down to 90% in the settings, wasting valuable pixels. The slightly narrower FOV in the Goggles 3 strikes a perfect balance, eliminating this issue and providing a crisper viewing experience.
For those interested in comparing different FOV, you can use this tool: https://oscarliang.com/js/fpvgogglefov.html

In terms of focus adjustment, the Goggles 3 starts with a default range of -6.0 to +2.0, which is slightly less than the G2’s range of -8.0 to +2.0. To address this, DJI includes two -2.0 diopter lenses that can be swapped in to extend the lower end of the focus range to -8.0. This effectively matches the adjustment capability of the Goggles 2, ensuring all users can achieve clear visibility.
The inter-pupillary distance (IPD) adjustment range of the Goggles 3, which I’ve verified personally, is indeed 56mm to 72mm. This measurement aligns with the official specifications, a rarity as IPD ranges are often exaggerated by manufacturers.

Comfort and Fitment
The Goggles 3 comes with a forehead pad design that significantly enhances comfort by reducing pressure on the eyes and nose. This adjustment proves especially beneficial for those long flights. Although the goggles don’t flip up like a visor with the hinge, they allow for angle adjustments. This design ensures the display gasket fits snugly against your face, optimizing the viewing experience and effectively minimizing light leakage.
The tension of the headband can be adjusted using a rotating mechanism behind the battery pack, similar to that of a bicycle helmet, allowing for a more personalized fit.

It’s important to note that FPV goggles will not fit everyone due to variations in facial shapes. However, from my experience, the Goggles 3 offers a more comfortable and secure fit compared to the Goggles 2, making it a superior choice for many users in terms of comfort and usability.
Real-time Live View
The DJI Goggles 3 introduces a new feature called “Real-time Live View,” which uses two front-facing cameras to provide a quick glance at your surroundings. To activate Live View, a user needs to double-tap the right side of the goggles. However, I’ve noticed that the sensitivity for this gesture is quite low, often requiring a really hard tap to register, which can be a bit frustrating.
Now, this feature might seem similar to technologies seen in products like Apple Vision or other VR goggles, but I can tell you it’s nothing like it. The image quality is relatively low at 720p, and the field of view is narrow due to the small screens with only 44° FOV, making it less impactful than one might hope. While some users might find it helpful for situational awareness, personally, I haven’t found it particularly useful in practical scenarios.
Live View offers both 2D and 3D modes: the 2D mode operates using only the right camera, while the 3D mode engages both cameras, providing a richer depth of field and a more immersive experience. Additionally, Real-time Live View can be used in Picture-in-Picture (PiP) mode in 2D, allowing users to maintain visibility of what’s directly in front of them while simultaneously viewing the drone’s video feed.
OcuSync 4.0
One of the most significant upgrades in the DJI Goggles 3 has to be OcuSync 4.0 transmission system (O4), which markedly improves the transmission of image and control signals between the drone and goggles. The OcuSync 4.0 offers several advantages over the previous OcuSync 3.0 (O3) system, including:
- Lower latency in Low Latency mode (1080p at 100fps), reducing from 30ms to 24ms, which enhances the responsiveness and control.
- An increased maximum bitrate, rising from 50Mbps to 60Mbps, which allows for higher image quality during flight.
- An expanded maximum range of 13km, up from 10km, providing greater flexibility and freedom.
Currently, the OcuSync 4.0 technology is exclusive to the Goggles 3. The Goggles 2 and Integra are limited to the older OcuSync 3.0 system and are unlikely to support the newer version due to hardware constraints. This distinction makes the Goggles 3 a more attractive option for those seeking the latest advancements in drone technology and communication efficiency.
Final Thought: Should You Buy DJI Goggles 3 or DJI Goggles 2?
When considering whether to purchase the DJI Goggles 3 or stick with the DJI Goggles 2, it’s important to evaluate your specific needs and the type of drone you intend to fly. As of now, if you’re planning to pilot the DJI Avata 2 drone, the DJI Goggles 3 is your only option. It is also compatible with the DJI Air 3 and Mini 4 Pro camera drones.
You can purchase the DJI Goggles 3 from these vendors:
However, the Goggles 3 currently does not support other DJI hardware, including the original Avata (V1), the DJI FPV drone, and the DJI O3 and Vista Air Units. If you are interested in building your own FPV drone using DJI’s FPV system, then the Goggles 2 or the Goggles Integra might be more suitable for you. I have a guide comparing the G2 and Integra: https://oscarliang.com/dji-goggles-integra/
The DJI Goggles 2 can be purchased at:
While there is uncertainty about whether DJI will enable backward compatibility for the Goggles 3, there are rumors suggesting that the release of the O4 Air Unit could be on the horizon. This new unit would potentially allow for the O4 video link in custom-built FPV drones and the use of personal radio transmitters. The DJI Remote Controller 3, while functional, is considered too small by some users, including myself.
I personally hope DJI will introduce backward compatibility for older video transmitters, as I find the Goggles 3 superior in terms of features and comfort compared to the Goggles 2, though comfort can be subjective.