

Streamlining Data Workflow with Apache Airflow on AWS EC2
Introduction
Apache Airflow is a powerful platform that revolutionizes the management and execution of Extracting, Transforming, and Loading (ETL) data processes. It offers a scalable and extensible solution for automating complex workflows, automating repetitive tasks, and monitoring data pipelines. This article explores the intricacies of automating ETL pipelines using Apache Airflow on AWS EC2. It demonstrates how Airflow can be used to design, deploy, and manage end-to-end data pipelines efficiently. The article uses a practical example of integrating a Weather API into an ETL pipeline, showcasing how Airflow orchestrates the retrieval, transformation, and loading of data from diverse sources.
Learning Outcomes
- Understanding the pivotal role of efficient ETL processes in modern data infrastructure.
- Exploring the capabilities of Apache Airflow in automating complex workflow management.
- Harnessing the flexibility and scalability of AWS EC2 for streamlined pipeline deployment.
- Demonstrating the application of Airflow in automating data extraction, transformation, and loading.
- Real-world integration of a Weather API, showcasing Airflow’s role in driving data-driven decisions.
What is Apache Airflow?
Apache Airflow is an open-source platform that manages and monitors Directed Acyclic Graphs (DAGs) workflows. It consists of a Scheduler, Executor, Metadata Database, and Web Interface. The Scheduler manages tasks, the Executor executes them on workers, and the Metadata Database stores metadata. The Web Interface provides a user-friendly dashboard for monitoring pipeline status and managing workflows. Apache Airflow’s modular architecture allows data engineers to build, automate, and scale data pipelines with flexibility and control.
What are DAGs?
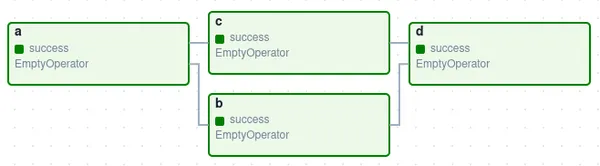
Directed Acyclic Graphs or DAGs define the sequence of tasks and their dependencies. They represent the logical flow of data through the pipeline. Each node in the DAG represents a task, while the edges denote the dependencies between tasks. DAGs are acyclic, which means they have no cycles or loops, ensuring a clear and deterministic execution path. Airflow’s DAGs enable data engineers to model complex workflows with ease, orchestrating the execution of tasks in parallel or sequentially based on their dependencies and schedule. By leveraging DAGs, users can design robust and scalable data pipelines that automate the extraction, transformation, and loading of data with precision and efficiency.
What are Operators ?
Operators are fundamental building blocks within Apache Airflow that define the individual units of work to be executed within a DAG. Each operator represents a single task in the workflow and encapsulates the logic required to perform that task. Airflow provides a wide range of built-in operators, each tailored to specific use cases such as transferring data between systems, executing SQL queries, running Python scripts, sending emails, and more. Additionally, Airflow allows users to create custom operators to accommodate unique requirements not covered by the built-in options. Operators play a crucial role in defining the functionality and behavior of tasks within a DAG, enabling users to construct complex workflows by orchestrating a series of operations seamlessly.
Launching EC2
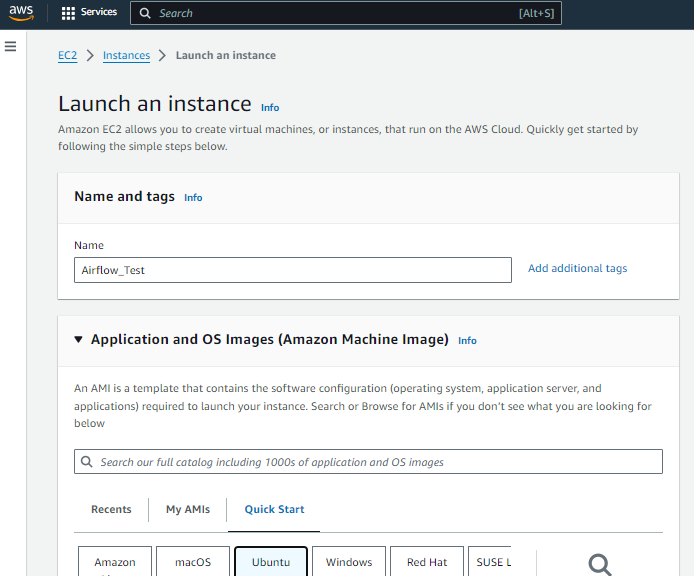
Launching an EC2 instance on AWS is a simple process. It is typically done through the AWS Management Console or command-line interfaces. To ensure Apache Airflow’s smooth operation, configure inbound rules to allow traffic on port 8080, the default port used by Airflow’s web server. This allows secure access to the Airflow web interface for monitoring and managing workflows. This streamlined setup balances resource allocation and functionality, laying the groundwork for efficient workflow orchestration with Apache Airflow on AWS EC2.
Installing Apache Airflow on EC2
To install Apache Airflow on a running EC2 instance, follow these steps:
Step1: Update Package Lists
Update package lists to ensure you have the latest information on available packages:
sudo apt updateStep2: Install Python 3 pip Package Manager
Install Python 3 pip package manager to facilitate the installation of Python packages:
sudo apt install python3-pipStep3: Install Python 3 Virtual Environment Package
Install Python 3 virtual environment package to isolate the Airflow environment from the system Python installation:
sudo apt install python3-venvStep4. Create Virtual Environment for Airflow
python3 -m venv airflow_venvStep5. Activate the Virtual Environment
source airflow_venv/bin/activateStep6. Install Required Python Packages for Airflow
pip install pandas s3fs apache-airflowStep7. Start Airflow Web Server in Standalone Mode
airflow webserver --port 8080With these commands, you’ll have Apache Airflow installed and running on your EC2 instance. You can then access the Airflow web interface by navigating to the instance’s public IP address followed by port 8080 in a web browser.
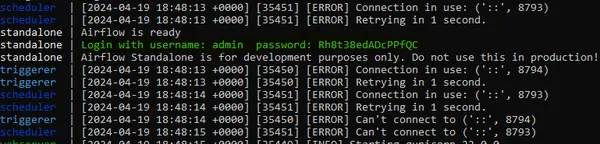
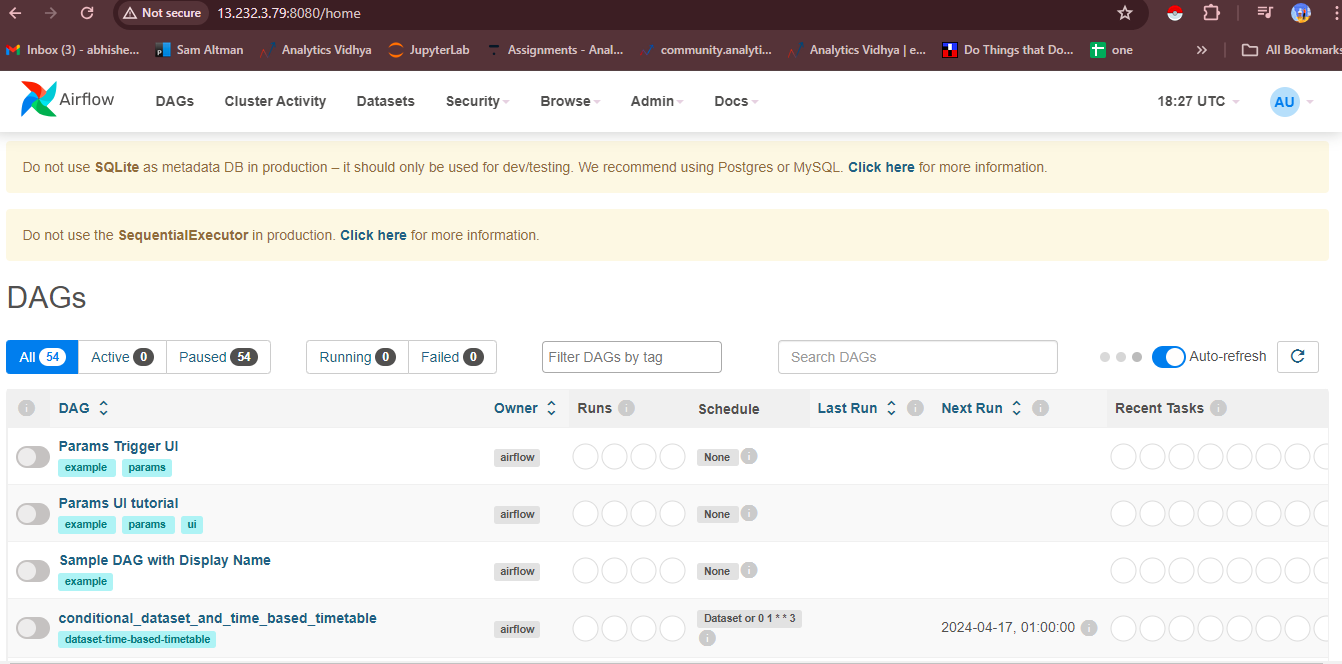
After navigating to port 8080 on your EC2 instance’s public IP address, you’ll be directed to the Apache Airflow web interface. Upon your first visit, you’ll be prompted to enter the admin password. This password is generated and displayed in your terminal after running the `airflow standalone` command. Simply copy the password from your terminal and paste it into the password field on the Airflow web interface to authenticate as the admin user. Once logged in, you’ll have access to the full functionality of Apache Airflow, where you can manage and monitor your workflows with ease.
Linking EC2 THrough SSH Extension
Let’s explore a new approach by linking our EC2 instance with VS Code through the SSH extension.
Step1. Install Visual Studio Code on Your Local Machine
If you haven’t already, download and install Visual Studio Code on your local machine from the official website: [Visual Studio Code](https://code.visualstudio.com/).
Step2. Install Remote – SSH Extension in VSCode
Open Visual Studio Code and install the Remote – SSH extension. This extension allows you to connect to remote machines over SSH directly from within VSCode.
Step3. Configure SSH on EC2 Instance
Ensure that SSH is enabled on your EC2 instance. You can do this during the instance creation process or by modifying the security group settings in the AWS Management Console. Make sure you have the key pair (.pem file) that corresponds to your EC2 instance.
Step4. Retrieve EC2 Instance’s Public IP Address
Log in to your AWS Management Console and navigate to the EC2 dashboard. Find your instance and note down its public IP address. You’ll need this to establish the SSH connection.
Step5. Connect to EC2 Instance from VSCode
In VSCode, press `Ctrl+Shift+P` (Windows/Linux) or `Cmd+Shift+P` (Mac) to open the command palette. Type “Remote-SSH: Connect to Host” and select it. Then, choose “Add New SSH Host” and enter the following information:
- Hostname: Your EC2 instance’s public IP address
- User: The username used to SSH into your EC2 instance (typically “ubuntu” for Amazon Linux or “ec2-user” for Amazon Linux 2)
- IdentityFile: The path to the .pem file corresponding to your EC2 instance’s key pair
Step6. Connect and Authenticate
After entering the required information, VSCode will attempt to connect to your EC2 instance over SSH. If prompted, choose “Continue” to trust the host. Once connected, VSCode will open a new window with access to your EC2 instance’s file system.
Step7. Verify Connection
You can verify that you’re connected to your EC2 instance by checking the bottom-left corner of the VSCode window. It should display the name of your EC2 instance, indicating a successful connection.
Writing DAG File
Now that you’ve connected your EC2 instance to VSCode, you’re ready to start writing the code for your ETL pipeline using Apache Airflow. You can edit files directly on your EC2 instance using VSCode’s familiar interface, making development and debugging a breeze.
Now we will sign up on the Weather API website for API https://openweathermap.org/api and use it to get the weather data.Once we access our EC2 instance in VS Code, we’ll notice the Airflow folder where we previously installed the software. Inside this directory, we’ll create a new folder named “DAG” to organize our Directed Acyclic Graph (DAG) files. Here, we’ll begin writing our Python script for the DAG, laying the foundation for our workflow orchestration.
Making a Connection
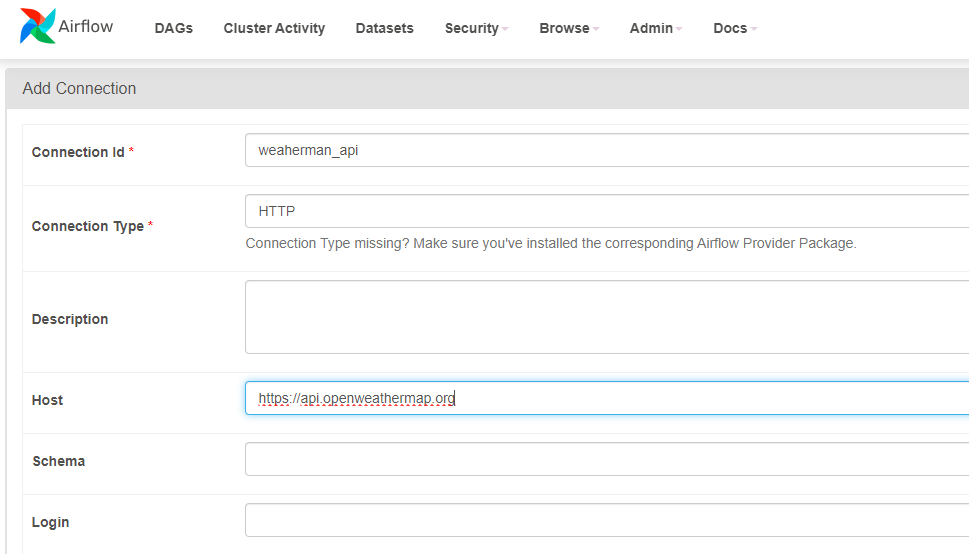
To verify the availability of the API, we’ll first navigate to the Airflow UI and access the admin section. From there, we’ll proceed to add a new connection by clicking on the “Connections” tab. Here, we’ll specify the connection ID as “weathermap_api” and set the type to “HTTP”. In the “Host” field, we’ll input “https://api.openweathermap.org”. With these settings configured, we’ll establish the connection, ensuring that our API is ready for use in our ETL pipeline.
So now we are done with the first step of checking if API is available we will extract weather data from the API and store it in a S3 Bucket. So for Storing the data in S3 bucket we will need some permissions to add with ec2-instance for that we will go to our instance click on Actions and then select “Security” from the dropdown menu. Here, you’ll find the option to modify the security settings of your instance. Click on “Modify IAM Role” to attach an IAM role.
Attaching S3 Bucket to EC2
In the IAM role management page, select “Create new IAM role” if you haven’t already created a role for EC2 instances. Choose the “EC2” service as the type of trusted entity, then click “Next: Permissions”.
In the permissions step, select “Attach policies directly”. Search for and select the policies “AmazonS3FullAccess” to grant full access to S3, and “AmazonEC2FullAccess” to provide full access to EC2 resources.
You can use this JSON also to add permission:
{
    "Version": "2012-10-17",
    "Statement": [
        {
            "Effect": "Allow",
            "Action": "s3:*",
            "Resource": "*"
        },
        {
            "Effect": "Allow",
            "Action": "ec2:*",
            "Resource": "*"
        }
    ]
}
Proceed to the next steps to review and name your IAM role. Once created, return to the EC2 instance’s security settings. In the IAM role dropdown, select the role you just created and click “Save”.
With the IAM role attached, your EC2 instance now has the necessary permissions to interact with S3 buckets and other AWS resources, enabling seamless data storage and retrieval as part of your ETL pipeline.
After granting the necessary permissions, you can proceed to create an S3 bucket to store the extracted weather data from the API.
Once the bucket is created, you can use it in your DAG to store the extracted weather data from the API. In your DAG script, you’ll need to specify the S3 bucket name as well as the destination path where the weather data will be stored. With the bucket configured, your DAG can seamlessly interact with the S3 bucket to store and retrieve data as needed.
Access Token Generation
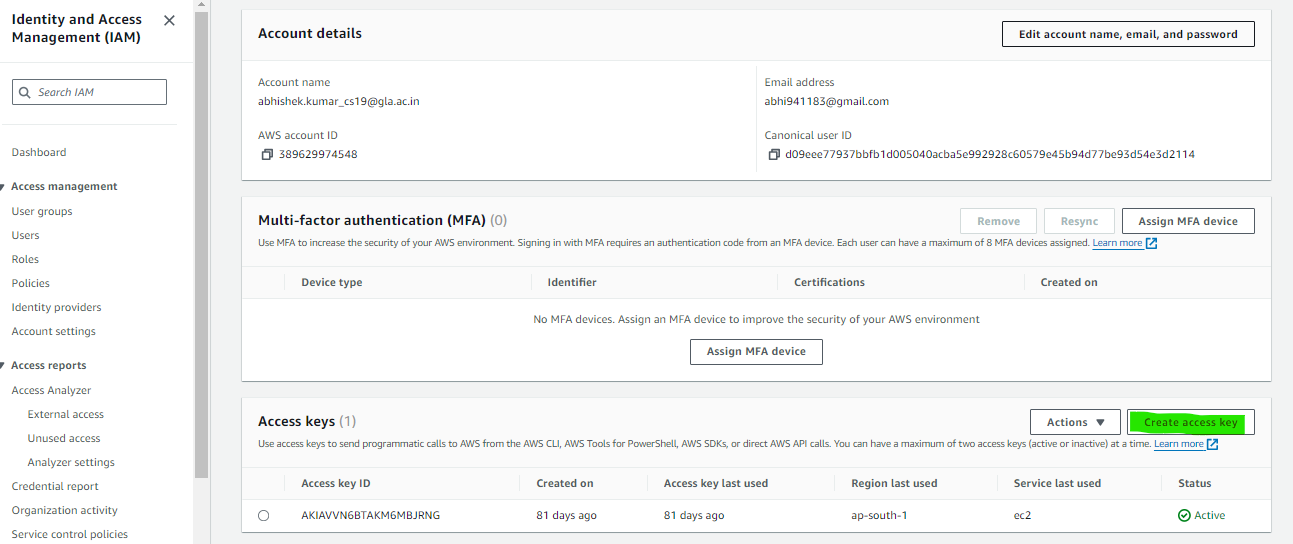
To obtain the necessary access token from AWS, navigate to the AWS Management Console and click on your account name or profile icon in the top-right corner. From the dropdown menu, select “My Security Credentials”. In the “Access keys” section, either generate a new access key or retrieve an existing one. Copy both the Access Key ID and Secret Access Key provided. These credentials will authenticate your requests to AWS services. Ensure to securely store the Secret Access Key as it will not be displayed again. With these credentials, you can seamlessly integrate AWS services, such as S3, into your Apache Airflow DAGs on your EC2 instance.
And now finally this is the DAG file with all 3 steps combined.
from airflow import DAG
from datetime import timedelta, datetime
from airflow.providers.http.sensors.http import HttpSensor
import json
from airflow.providers.http.operators.http import SimpleHttpOperator
from airflow.operators.python import PythonOperator
import pandas as pd


# Function to convert temperature from Kelvin to Fahrenheit
def kelvin_to_fahrenheit(temp_in_kelvin):
    temp_in_fahrenheit = (temp_in_kelvin - 273.15) * (9/5) + 32
    return temp_in_fahrenheit


# Function to transform and load weather data to S3 bucket
def transform_load_data(task_instance):
    # Extract weather data from XCom
    data = task_instance.xcom_pull(task_ids="extract_weather_data")

    # Extract relevant weather parameters
    city = data["name"]
    weather_description = data["weather"][0]['description']
    temp_farenheit = kelvin_to_fahrenheit(data["main"]["temp"])
    feels_like_farenheit = kelvin_to_fahrenheit(data["main"]["feels_like"])
    min_temp_farenheit = kelvin_to_fahrenheit(data["main"]["temp_min"])
    max_temp_farenheit = kelvin_to_fahrenheit(data["main"]["temp_max"])
    pressure = data["main"]["pressure"]
    humidity = data["main"]["humidity"]
    wind_speed = data["wind"]["speed"]
    time_of_record = datetime.utcfromtimestamp(data['dt'] + data['timezone'])
    sunrise_time = datetime.utcfromtimestamp(data['sys']['sunrise'] + data['timezone'])
    sunset_time = datetime.utcfromtimestamp(data['sys']['sunset'] + data['timezone'])

    # Transform data into DataFrame
    transformed_data = {"City": city,
                        "Description": weather_description,
                        "Temperature (F)": temp_farenheit,
                        "Feels Like (F)": feels_like_farenheit,
                        "Minimum Temp (F)": min_temp_farenheit,
                        "Maximum Temp (F)": max_temp_farenheit,
                        "Pressure": pressure,
                        "Humidity": humidity,
                        "Wind Speed": wind_speed,
                        "Time of Record": time_of_record,
                        "Sunrise (Local Time)": sunrise_time,
                        "Sunset (Local Time)": sunset_time
                        }
    transformed_data_list = [transformed_data]
    df_data = pd.DataFrame(transformed_data_list)

    # Store data in S3 bucket
    aws_credentials = {"key": "xxxxxxxxx", "secret": "xxxxxxxxxx"}
    now = datetime.now()
    dt_string = now.strftime("%d%m%Y%H%M%S")
    dt_string = 'current_weather_data_portland_' + dt_string
    df_data.to_csv(f"s3://YOUR_S3_NAME/{dt_string}.csv", index=False,
    storage_options=aws_credentials)


# Define default arguments for the DAG
default_args = {
    'owner': 'airflow',
    'depends_on_past': False,
    'start_date': datetime(2023, 1, 8),
    'email': ['[email protected]'],
    'email_on_failure': False,
    'email_on_retry': False,
    'retries': 2,
    'retry_delay': timedelta(minutes=2)
}


# Define the DAG
with DAG('weather_dag',
         default_args=default_args,
         schedule_interval="@daily",
         catchup=False) as dag:

    # Check if weather API is ready
    is_weather_api_ready = HttpSensor(
        task_id='is_weather_api_ready',
        http_conn_id='weathermap_api',
        endpoint="/data/2.5/weather?q=Portland&APPID=**********************"
    )

    # Extract weather data from API
    extract_weather_data = SimpleHttpOperator(
        task_id='extract_weather_data',
        http_conn_id='weathermap_api',
        endpoint="/data/2.5/weather?q=Portland&APPID=**********************",
        method='GET',
        response_filter=lambda r: json.loads(r.text),
        log_response=True
    )

    # Transform and load weather data to S3 bucket
    transform_load_weather_data = PythonOperator(
        task_id='transform_load_weather_data',
        python_callable=transform_load_data
    )

    # Set task dependencies
    is_weather_api_ready >> extract_weather_data >> transform_load_weather_data
Explanation
- kelvin_to_fahrenheit: This function converts temperature from Kelvin to Fahrenheit.
- transform_load_data: This function extracts weather data from the API response, transforms it, and loads it into an S3 bucket.
- default_args: These are the default arguments for the DAG, including owner, start date, and email settings.
- weather_dag: This is the DAG definition with the name “weather_dag” and the specified schedule interval of daily execution.
- is_weather_api_ready: This task checks if the weather API is ready by making an HTTP request to the API endpoint.
- extract_weather_data: This task extracts weather data from the API response using an HTTP GET request.
- transform_load_weather_data: This task transforms the extracted data and loads it into an S3 bucket.
- Task Dependencies: The >> operator defines the task dependencies, ensuring that tasks execute in the specified order.
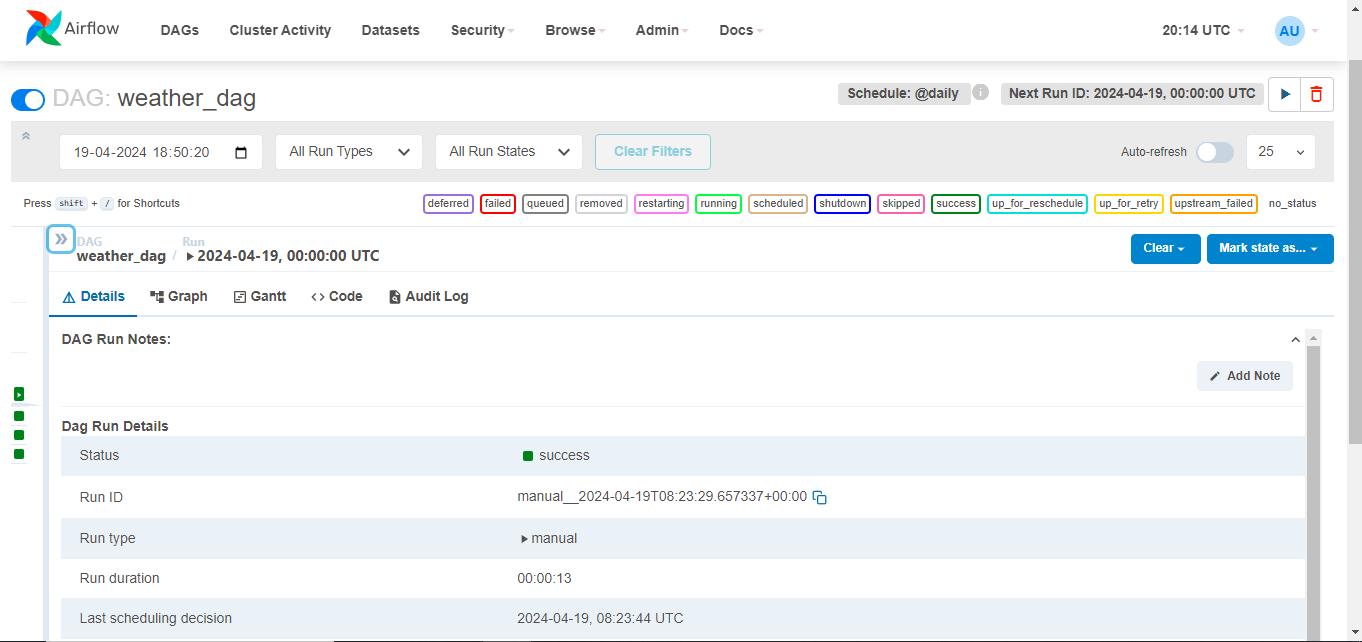
The DAG file is a tool that automates the extraction, transformation, and loading of weather data from the API into an S3 bucket using Apache Airflow. It is displayed in the Airflow UI, allowing users to monitor its status, trigger manual runs, and view task logs. To test the DAG, users can trigger a manual run, expand its details, and click the “Trigger DAG” button. Task logs can be viewed to track individual tasks and diagnose issues. The Airflow UI simplifies the workflow orchestration process.
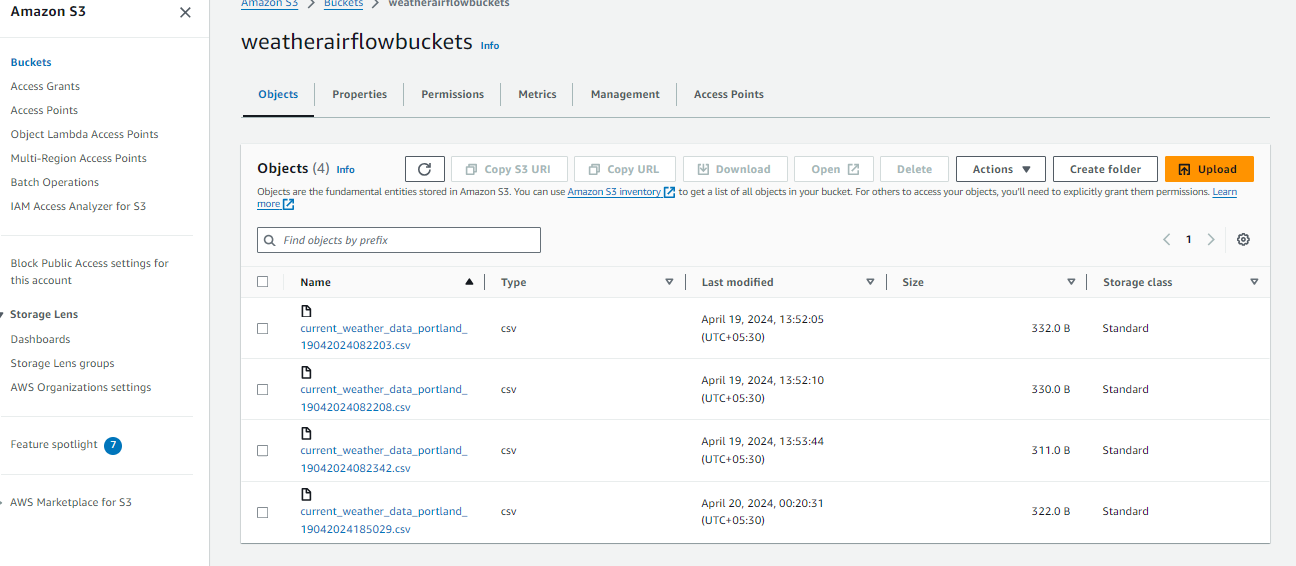
After completing the automated ETL pipeline, it’s crucial to verify the stored data in the S3 bucket. Navigate to the AWS Management Console and locate the bucket where the weather data was configured. Verify the data’s correct storage by exploring its contents, which should contain files organized according to the specified destination path. This confirms the automated ETL pipeline’s functionality and secure storage in the designated S3 bucket, ensuring the reliability and effectiveness of the automated data processing workflow.
Conclusion
The integration of Apache Airflow with AWS EC2 presents a robust solution for automating ETL pipelines, facilitating efficient data processing and analysis. Through our exploration of automating ETL processes with Airflow and leveraging AWS resources, we’ve highlighted the transformative potential of these technologies in driving data-driven decision-making. By orchestrating complex workflows and seamlessly integrating with external services like the Weather API, Airflow empowers organizations to streamline data management and extract valuable insights with ease.
Key Takeaways
- Efficiency in ETL processes is critical for organizations to derive actionable insights from their data.
- Apache Airflow provides a powerful platform for automating ETL pipelines, offering flexibility and scalability.
- Leveraging AWS EC2 enhances the capabilities of Airflow, enabling seamless deployment and management of data workflows.
- Integration of external services, such as the Weather API, demonstrates the versatility of Airflow in orchestrating diverse data sources.
- Automated ETL pipelines enable organizations to drive data-driven decision-making, fostering innovation and competitive advantage in today’s data-driven world.